Lifestyle-- 1 day ago

From a simple, no-tears way to tackle an onion to a gravy that really pushes the boat out, you should be learning these key culinary tips and techniques
Well, would you look at that? Five weeks into lockdown and everyone’s nearest and dearest have turned into Gordon Ramsay. Whether they’re sautéeing or sous-videing in the background of a Zoom call, spending endless evenings trying to recreate their restaurant favourites or making the most elaborate self-isolated brunches known to man, the nation has caught the culinary bug.
But there’s an issue. An over-cooked, under-seasoned, soggy-bottomed issue. And it’s simply this: everyone is trying too hard. You may think that you’re ready to braise and broil your way through a shelf-full of cookbooks, and experiment with ingredients you can’t even pronounce, but the likelihood is that you don’t even have the basics down. So, before you attempt blanching another batch of kohlrabi, learn these five indispensable basic kitchen skills.
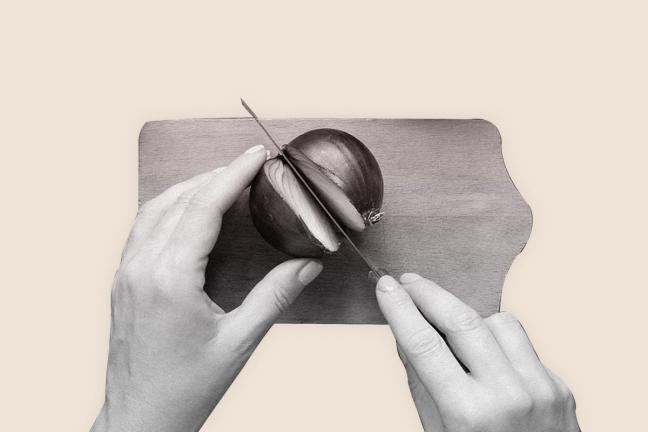
That’s right, we’re starting this simply. Because, despite the humble onion being the starter for most savoury dishes and sauces we cook, many people can’t even chop them properly. And, as you know, you shouldn’t chiffonade before you can walk. So here’s the ideal, proven way to chop an onion — and yes, there may be tears ahead.
Step #1: Cut off both ends of the onion with a sharp, multi-purpose knife. Peel the onion and dispose of the skin.
Step #2: Chop the onion in half from top to bottom.
Step #3: Take half of the onion, and press it flat to the chopping board, with your palm keeping pressure on the top. Cut it laterally, chopping layers one centimetre apart.
Step #4: Next, chop the onion perpendicular to the chopping board, ensuring your cuts are still one centimetre apart.
Step #5: Finally, spin the onion 90 degrees and repeat the last step, ensuring you have equally sized, diced cubes.
And that’s it. A basic, effective, no-tears way to tackle an onion. And, this way, you’ll end up with cubes of onion that will sweat-out or fry-off evenly — giving you a fine foundation to any meal you choose to cook.

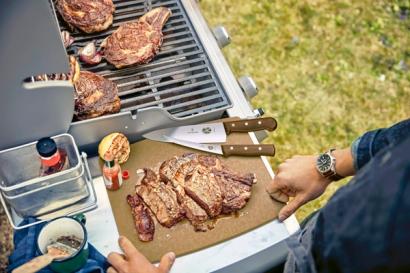
What’s the best cut of beef you can name? Fillet? Ribeye? No. They may be up there but, treated well, there are plenty better options. We’re talking chuck roast, brisket, hanger and flank steaks. These options are not only cheaper, but they’ll also yield better results and more intense flavours if treated right. And how do you treat them right, we hear you ask? Bash the living daylights out of them, that’s how.
Step #1: Begin by laying out your chosen cut of meat on a square of greaseproof paper, as flat as it will go.
Step #2: Next, pick up your meat tenderiser (it looks like a wooden mallet with spikes on its face) and firmly and evenly hit the meat all over, tapping downwards like a hammer hitting a nail.
Step #3: Turn the meat over and repeat — without using too much force.
Follow these simple steps and your meat will fall apart in your mouth. But beware, tenderise too vigorously and your meat will fall apart right there on the chopping board. The temptation may be to swing your tenderiser like a medieval weapon, but don’t get too carried away — otherwise there’ll be nothing left for you to chew. Remember, a tactical tenderising is a tasty tenderising.

Considering it’s one of our favourite carbs, we don’t half know how to mess up pasta. Whether it’s al dente to the point of crunchy, or just so overboiled that it turns to mush, many amateur – and even some professional – chefs land themselves in hot water cooking pasta. But don’t get your fusilli in a twist (actually, bad example, come to think of it…) and listen up. Here are six simple steps to ensure the perfect plateful every time.
Step #1: Measure out your pasta. Regardless of type, opt for 100 grams of dried pasta for each person. Simple.
Step #2: Fill a large, high-sided saucepan with enough water to reach an inch or so from the top. Salt this water, and bring it to a rolling, consistent boil. Not a simmer — a boil.
Step #3: Add your pasta and cook for 4 minutes exactly. At this point, test the pasta. It should have almost cooked, but still have a little bite to it.
Step #4: For ribbon pasta, such as spaghetti or linguine, leave for another minute. For smaller shapes, such as penne or farfalle, leave for another 2 minutes to finish cooking.
Step #5: Remove your pan from the heat, drain the pasta through a colander and leave to stand — steam-drying — for two minutes before adding sauce or serving.
See? Not that difficult, after all. And it pays to follow these instructions to get the perfect texture on your pieces of pasta. Neglect to boil them for long enough, and the pasta will have a chalky feel to it; too long and it won’t hold together, especially if you’re serving it with a dense sauce. And, whatever you do — and however Italian you’re feeling — never, ever throw it at a wall.

Another day, another plate of utterly butchered scrambled eggs for breakfast. Are we right? There’s something so beautiful and creamy about the perfect plate of scrambled eggs, but it’s a technique we’ve just not yet cracked. Considering they’re made with just a handful of ingredients, it’s a wonder we find so many ways to mess them up. But follow these steps keenly, and you’ll never make soggy scrambled eggs again.
Step #1: Crack two large eggs (you should know how to do this by now) into a medium-sized bowl and whisk together (with an actual whisk, no forks) with a liberal pinch of salt and six tablespoons of single cream.
Step #2: Put a medium-sized frying pan over a medium heat for one minute. Add a small knob of butter.
Step #3: As soon as it has completely melted (but only melted, never browned), pour in your egg mixture and let it sit for 20 seconds. As much as you’ll want to, refrain from stirring.
Step #4: Slide a flat spatula under the eggs and fold over once. Wait for ten seconds and then do it again.
Step #5: Repeat this until your eggs are softly set, but still a little runny in places.
Step #6: Remove from the heat and sit in the pan for 10 seconds. Now you may stir, and serve immediately.
As sure as eggs, you’ll have the perfect plateful ready to eat. And see? There was no sour cream, mascarpone or — shudder the thought — mayonnaise being chucked in to make it taste better or cream up. No, no. Treat the eggs right, and alone they’ll make the best clucking breakfast you’ve ever had.

Granules, be gone! If your first instinct when asked to whip up a silky smooth, glossy gravy is to reach for the Bisto, then we don’t even know why you’re here. Your boat deserves better than that, your roast deserves better than that and you deserve better than that. Every self-respecting man should be able to take the meat from his roasting tin, and make a beautiful gravy from the juices and scraps that remain. Here’s how:
Step #1: After removing your meat, place the roasting tin over heat on the hob and tilt to the side. Once the fat has melted and gathered at one side, spoon it out into a bowl and place to the side.
Step #2: Add two teaspoons of fat back into the pan, still over the heat, and scrape any scraps from the base of the pan with a wooden spoon.
Step #3: Add a tablespoon of flour and quickly stir everything in the pan together, to form a smooth paste.
Step #4: Gradually add 500ml of boiling stock — depending on your meat — and whisk together until smooth.
Step #5: Add salt, pepper and a dash of soy sauce for colour. Decant into a jug and serve.
Enough to get your mouth watering, isn’t it? And trust us, it’ll taste better than any of that shop-bought stuff you’re used to. Douse your roast in this homemade gravy and it’ll be the best part of your meal. And, for an extra decadent dish, throw in a glug of red wine or port.
Want more tips around the kitchen? Chef Tom Hunt shares his home-cooking must-haves…
Join the Gentleman’s Journal Clubhouse here.
To receive the latest in style, watches, cars and luxury news, plus receive great offers from the world’s greatest brands every Friday.